 The Agnolotti (pronounced anneolottee) are a tipical Piedmontese starter. (Ubersetzen von Sabine Christodoulou)
They are made from thin sheets of dough filled with minced roast of beef, minced roast of pork, and spinach all mixed together (some times also roast of rabbit). When prepared elsewhere than in Piedmont, agnolotti are called “ravioli”: Ravioli may be filled with anything edible, such as ricotta and cheese.
The Agnolotti – 6 to 8 servings
Difficulty: medium
Time to prepare: 1 1/2 hour, plus the time to roast and mince the meat.
Ingredients
200 gr. of roast of Pork
200 gr. of roast of Veal (Beef will do but Veal is what the poeiginal recipe calls for)
300 gr of spinach
50 gr of Parmigiano Reggiano
500 gr. of flour (type 00 – the same flour you’d use to make your own bread)
170 ml of warm water
3 eggs
1 Teaspoon of Extra Virgin Olive Oil
2 Teaspoons of Soffritto
2 cloves of Garlic
1 twig of Rosemary
2 Teaspoons of Salt
A Pinch of Pepper
50 gr. of Butter
5/6 leafs of sage
Preparation
For the Dough
Place the flour in a bowl; push the flour from the middle of the bowl to the sides so as to leave a hollow center; add one teaspoon of extra virgin olive oil, sprinkle the flour with two teaspoon of salt, add two eggs, add about half of the water and mix thoroughly with a fork. Add the rest of the water, a little at the time, and keep mixing. Once the flour is mixed, check for consistency: add some water if too dry, add some flour if too liquid. Pour the dough on a wooden board like the one shown, and knead it by pressing it in a forward motion with the heels of your hand. Keep kneading until the dough becomes a uniform paste. If the dough is still too liquid it will tend to stick to the wooden board: in this case add some flour and keep kneading. The dough is ready when it makes a soft round ball which does not stick to the board nor your fingers. When you get enough practice doing this, it will take you no more than 10/15 minutes to prepare the dough.
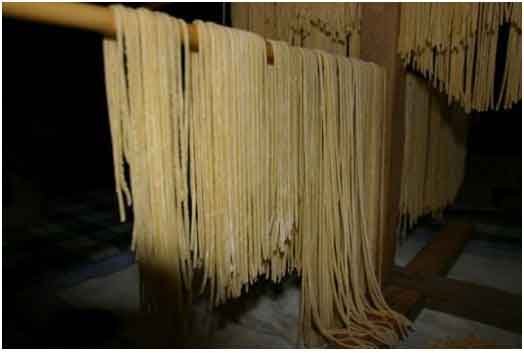
Now it’s time to prepare the strips of pasta: I use a pasta machine to do this, the one shown on the picture. Cut a piece of dough, spread it a little with your fingers, then pass it through the rolls from thick to thin. I like the pasta very thin, so as to enhance the taste of the filling: so my strips are as thin as the machine allows them to be. Each strip should be as large as the pasta machine and about 40/50 cm long. Cover the strips of pasta with a wet towel, otherwise the dough would dry on you. Now remember this: some recipe will recommend to leave the dough for one hour or more to rest. DON’T DO THIS, especially if you don’t have a pasta machine, and have use a rolling pin instead. If the dough is left to rest it will become chewy and elastic, and it will be that more difficult to spread thin into sheets of past.
For the Filling
I use a cast iron casserole to roast the meat, but you can use anything else you might be more accustomed to. Pour some oil in the casserole, add two teaspoons of soffritto (optional: but I recommend it strongly), add the two pieces of meat , sprinkle some salt and pepper, add two cloves of garlic, one twig of rosemary, cover the casserole, and let cook a low heat for about 45 minutes. Check periodically, and add some white wine as required.
While the meat is roasting, pour the spinach in a sauce pan, add some water but not as much as to cover the veggies, and let them cook for no more than 10 minutes from the time the water is boiling. Let the spinach cool, then squeeze them thoroughly between your hands to eliminate any excess water.
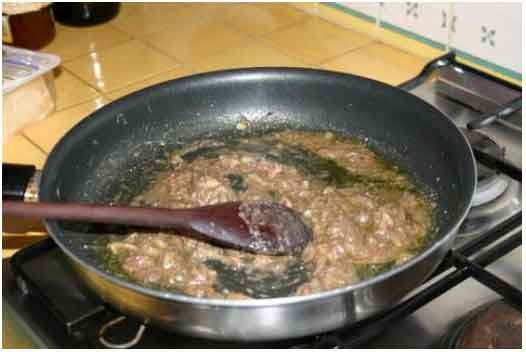
Cut the roasted meat in tiny pieces, as shown, mix the meat with the spinach then grind everything with a meat mincer. Should you not have one of these kitchen wonders, You’ll have to use a kitchen knife o, better, a rocking knife, to do so. Keep in mind that the meat must be minced very finely. Now pour everything in a salad bowl, add the grated Parmigiano Reggiano cheese, and mix. If you have properly squeezed the water out of the spinach, the mix should be dry. Add one egg and mix thoroughly with your hands: the filling must be moist but NOT creamy.
For the Agnolotti
Put one sheet of pasta flat on your wooden board, take a lump of filling in your hand and, using your other hand’s fingers, put dabs of filling, on the sheet of dough, every 5 cm. Then roll the pasta, gently, over the dabs, and, using your fingers, press the two slabs of pasta so that they stick together. Using the edge of your hands, press the dough in between the dabs. Now use a pastry wheel to cut into the agnolotti into individual pieces. Keep in mind that their ideal size is about 3cm by 3 cm square by 1,5 cm thick. When done by hand the agnolotti will all have a somewhat different shape and size: this is very charming and shows how hard you have worked to make them and how dedicated you are in cooking gourmet food. But try to keep them about the same size and volume so that they will cook evenly.
Using a “Ravioli Maker” may make things a little easier but won’t save you time. Sprinkle some flour on the surface, spread a sheet of dough on top and press lightly, fill the cavities with filling, cover the thing with a second sheet of pasta, press with your hand or, better, with a rolling pin, turn the “maker” over, and tap on it to extract the sheet of agnolotti. Separate them individually using pastry weel.
Now sprinkle a wooden plank with corn flour (because it’s powder is thicker than the that of the wheat ) and line the agnolotti on top. If at all possible, let them rest for a fortnight; if not, at least for a few hours.
Serving
Boil the water, then salt (you have put the right amount of salt when the water stops boiling); now pour the agnolotti in: they will be cooked just perfect when they start floating. So scoop them up as they float and pour them in the frying pan where you have melted the butter with a few leaves of sage.
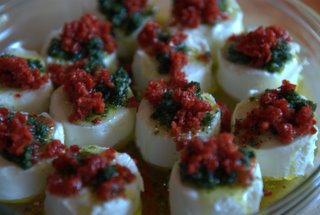
Serve a few agnolotti in the middle of dish as shown, maybe sprinkled with a little bit of grated Parmigiano Reggiano.
Enjoy !
 “Bagna Cauda” is the name of a meal very, very from Piedmont. It means “Hot Dip Sauce”.
This strongly flavoured meal is to be consumed in late Fall and in Winter: it is not recommended to eat “Bagna Cauda” in the spring or in summer, nor if you have a business meeting next day, for reasons evident if you keep reading.
“Bagna Cauda” is a gourmet feast made of anchovies, garlic and olive oil, cooked until the components become a creamy sauce. This is put hot (and kept so by a burner underneath) in an earthenware saucepan in the middle of the dining table, in which one dips the season’s vegetables: the hunchback thistle from Nizza Montferrato, the celery, the pepper, raw or oven cooked, the onion, strictly oven cooked, the topinambur (everybody knows this tuber by it’s popular name Helianthus tuberosus, or as the Jerusalem artichoke), the turnip, oven cooked, the Brussels cauliflowers (a later addition to the recipe, because, coming from Belgium, it was not commonly available in Piedmont during the Middle Ages), boiled and broiled, endives, leek, boiled potatoes, oven cooked pumpkin, apples, and anything available, but meat.
This is a strictly vegetarian meal.
The dish was invented by accident, or fertile imagination, out of the pressing need to feed family and relatives in winter, when no crops were available; as a matter of fact, if Piedmont had the wine, the veggies, and the garlic, it certainly did not have anchovies nor extra virgin, cold pressed, first choice, olive oil.
Apparently, and this is history brought to our times by word of mouth, and by no means the only theory espoused by historians, two things happened back then: the mountain farmers of Val Maira, decided to barter hats, woollen clothes, and oak barrels (what we call today “barrique”) of which they were abundant, with fish and salt, of which they had none. Fish for food, and salt for their cows, sheeps and goats. They did barter with the people of Liguria because neither they, nor them, had the money to pay for what they wanted to trade. Salt, by the way, was a commodity very sought after in Piedmont: in the very spirit with which lords and kings and the likes where managing and supporting their vassals, salt was heavily taxed.
So, the mountain farmers of Val Maira would walk to Liguria, barter salt and anchovies, then cheap and abundant in the Mediterranean sea, for hats and capes; they would put the salt and the anchovies in their wooden barrels, anchovies on top, claiming, when stopped by the local sheriff, that the barrels contained only anchovies (not taxed) and no salt, and would sell both on the road as well as once back home. No one has ever reported a sheriff checking for salt under the fish, nor of fining a Val Maira farmer for trading on salt, and not pay the corresponding taxes.
Keeping in mind that in those times refrigerators were not widely available, storing fish in salt made sense. So this part of the hearsay is probably true. One can argue that the trade was done with Liguria, or that the salt would come from Spain, but salted fish looks like a sure thing.
The link between the trade in salt and anchovies, the veggies and, ultimately, the “Bagna Caoda” has not been firmly established: but some would argue that the availability of these ingredients, and a lot of imagination by a local cook, resulted in its invention.
The original recipe follows.
The original recipe
Ingredients: 3 salted anchovies per person, 1 head of garlic per person, ½ glass of olive oil per person, 1 glass of milk, 1 glass or 2 of tomato sauce, and all the vegetables listed above, raw, boiled or broiled.
Preparation: put the anchovies in water overnight, then wash in fresh water, then de-bone the fish. Cut the garlic cloves in pieces then put anchovies and garlic in a pan and cook, very slowly: never, ever let the oil boil or the garlic brown. Add the glass of milk and the tomato sauce when the anchovies start to melt. Cook for as long as required for the mix to become a creamy sauce.
Served: hot, with vegetables. Add cold oil to the sauce as required while eating.
“Bagna Cauda” is very filling: it is a one course meal. But being also pretty heavy to digest, it is normally followed by a light bouillon of beef. “Bagna Caoda” also causes the person eating it to have a strong garlicky flavoured breath for quite a while, normally for a few days.
Today’s recipe
This (lighter) version of the original recipe is definitely easier on your stomach: furthermore your breath will be garlicky for only one day.
Ingredients: 3 salted anchovies per person, 3 cloves of garlic per person, ½ glass of olive oil per person, 1 glass of milk, 1 glass or 2 of tomato sauce, and all the vegetables listed above, raw, boiled or broiled.
Preparation: put the anchovies in water for a fortnight, then wash in fresh water, then de-bone the fish. Cut the garlic cloves in small pieces and boil them in milk until they become mushy. This operation will take out the sting of the garlic while maintaining its unique flavour. Then put anchovies and garlic in a pan and cook, very slowly: never, ever let the oil boil or the garlic brown. Add one or two glasses of milk and the tomato sauce when the anchovies start to melt. Cook for as long as required for the mix to become a creamy sauce.
Served: hot, with vegetables. Add cold oil to the sauce as required while eating.
 “Bagnet” means sauce in the local dialect, There is no known controversy regarding the origin nor the content of this recipe,
although nobody knows when it was invented: even Google recognizes it as a Piedmonts’ recipe. It is used to dress the “bollito”, and the ”bollito misto” (boiled meat, and mix of boiled meat), or as dip. It comes in two variants: green and red.
The green variety of “Bagnet”
Difficulty: easy
Time to prepare: 20 minutes
Ingredients
4 filets of anchovies
200 gr. of parsley
2 cloves of garlic
100 ml of extra virgin oil
Pinch of salt (optional: just a pinch; I normally do not add any. But it depends on how tasty the parsley is)
Bread crumbs
Hot pepper (optional)
Preparation
Wash the parsley thoroughly, than discard the stems. Put the anchovies and the parsley on a cutting surface, and roughly cut both with a knife, then finely mince them with a rocking knife. Do not use a blender: it would make a mushy pulp out of the ingredients when they need only be finely minced. Put all the thing, except the bread crumbs, in a tall container and mix manually. Since the sauce has to be a dense liquid more than a soft cream, add the bread crumbs while mixing until you achieve the desired consistency. If too dense add some oil, if too liquid add some more bread crumbs. If you want a spicy bagnet, add some finely minced hot pepper. Don’t put too much of it or you’ll lose most of the delicate taste and smell of the bagnet.
This much bagnet is enough for 6 to 8 servings.
The red variety of “Bagnet”
Difficulty: easy
Time to prepare: 2 hours
Ingredients
100 gr. of soffritto,
Hot pepper,
White wine,
Pinch of salt,
2 ripe tomatoes, or 150 ml. of tomato sauce.
Preparation
Slowly fry the soffritto in extra virgin olive oil until the soffritto adopts a yellow-brownish color. Add some white wine, as required, so that the soffritto does not burn. Let the wine evaporate. In the mean time peel the tomatoes, and cut them in pieces. Pour the tomatoes and a pinch of red pepper in the pan and let cook very gently for 1 hour. Stir occasionally.
 Gli gnocchi – 6 to 8 servings
Difficulty: medium
Time to prepare: 40 minutes, plus 1 hour to broil or boil the potatoes.
Gnocchi make for a great first course.
They are less known than pasta as an Italian recipe, are somewhat easier to make than pasta, are very delicate in taste and aroma, and they will make you look great. They are also inherently Italian and are served with about any type of dressing. There are different ways to prepare the gnocchi. This is how they are prepared in Piedmont.
Ingredients
1 Kg of potatoes
300 gr. of wheat flour
1 egg
A pinch of salt
Preparation
Boil the potatoes, with their skin on, peel while warm, mash, and let rest for a few hours: this is meant to let the mashed potato dry out some, as well as to cool them.
{gallery}A_GNOCCHI/gallery}
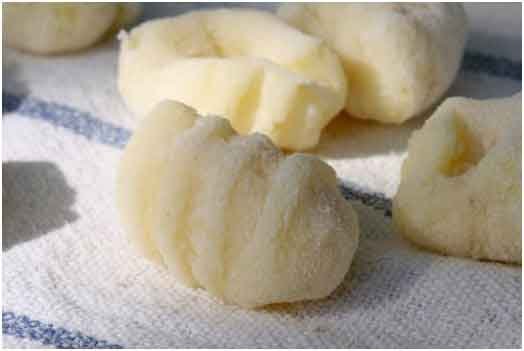
An alternative to boiling the potatoes is to cook them, with their skin on, in the oven, set at 200 Celsius (or 390 Fahrenheit) for about 40 minutes. I personally prefer to boil them and then have them rest until worm, but both procedures are perfectly acceptable. Add the egg, and about 150 gr. of wheat flour, mix well with your hands, put the dough on a plank and knead gently. Sprinkle with some wheat flour as necessary but DO NOT use all the flour. Cut a piece of dough then roll gently until it assumes a sausage-like shape, about 1.5 cm (0.6 inches) in diameter. The sausage like dough must have a soft consistency, and shall not stick to the plank. If it does, sprinkle the plank with wheat flour, and keep rolling the dough gently: it will not stick. Cut the sausage-like dough in pieces 1,5 cm long: if the consistency is right the cut pieces shall not stick to the knife. If they do, the dough is still too moist. If this is the case add some more flour.
Now’s the trickiest part: gnocchi made in Piedmont are ridged: this technique increases the cooking surface of the gnocchi and also makes them look better than just sliced sausage. You do this by holding a fork at 300 angle and rolling each gnocco on it: by applying the right amount of pressure, the gnocco will be holed on one side and ridged on the other. You might have to practice his awhile: you’ll get it right one day. Put the gnocchi on a towel: you can cook them right away or keep them in a dry room for about 24 hours by sprinkling them with dry wheat flour and covering them with a towel.
A variant to this recipe is to use 100 gr. of wheat flour and 100 gr. of chestnut flower. The gnocchi will become slightly sweet: the taste and smell is unique. On top of that very few people, including our most renown cooks know about this recipe.
To cook, pour the gnocchi in boiling water, scoop as they start floating and pour in the frying pan where you have pre-heated the dressing. Stir gently and serve hot.
Gli gnocchi – 6 to 8 servings
Difficulty: medium
Time to prepare: 40 minutes, plus 1 hour to broil or boil the potatoes.
Gnocchi make for a great first course.
They are less known than pasta as an Italian recipe, are somewhat easier to make than pasta, are very delicate in taste and aroma, and they will make you look great. They are also inherently Italian and are served with about any type of dressing. There are different ways to prepare the gnocchi. This is how they are prepared in Piedmont.
Ingredients
1 Kg of potatoes
300 gr. of wheat flour
1 egg
A pinch of salt
Preparation
Boil the potatoes, with their skin on, peel while warm, smash, and let rest for a few hours: this is meant to let the smashed potato dry out some, as well as to cool them.
{gallery}A_GNOCCHI/gallery}
An alternative to boiling the potatoes is to cook them, with their skin on, in the oven, set at 1600 Celsius (or 3200 Fahrenheit) for about 40 minutes. I personally prefer to boil them and then have them rest overnight, but both procedures are perfectly acceptable. Add the egg, and about 100 gr. of wheat flour, mix well with your hands, put the dough on a plank and knead gently. Sprinkle with some wheat flour as necessary but DO NOT use all the flour. Cut a piece of dough then roll gently until it assumes a sausage-like shape, about 1.5 cm (0.6 inches) in diameter. The sausage like dough must have a soft consistency, and shall not stick to the plank. If it does, sprinkle the plank with wheat flour, and keep rolling the dough gently: it will not stick.Cut the sausage-like dough in pieces 1,5 cm long: if the consistency is right the cut pieces shall not stick to the knife. If they do, the dough is still too moist. If this is the case add some flour.
Now’s the trickiest part: gnocchi made in Piedmont are ridged: this technique increases the cooking surface of the gnocchi and also makes them look better than just sliced sausage. You do this by holding a fork at 300 angle and rolling each gnocco on it: by applying the right amount of pressure, the gnocco will be holed on one side and ridged on the other. You might have to practice his awhile: you’ll get it right one day. Put the gnocchi on a towel: you can cook them right away or keep them in a dry room for about 24 hours by sprinkling them with dry wheat flour and covering them with a towel.
A variant to this recipe is to use 100 gr. of wheat flour and 100 gr. of chestnut flower. The gnocchi will become slightly sweet: the taste and smell is unique. On top of that very few people, including our most renown cooks know about this recipe.
To cook, pour the gnocchi in boiling water, scoop as they start floating and pour in the frying pan where you have pre-heated the dressing. Stir gently and serve hot.
 I have always wanted to make my own “grissini” (bread sticks) because I could not find the one available in shops around here to my liking (too soft, too greasy, too hard, etc .. etc..).
I have always wanted to make my own “grissini” (bread sticks) because I could not find the one available in shops around here to my liking (too soft, too greasy, too hard, etc .. etc..).
Not even the ones made in Torino! Taste and texture was my main motivation. Fame came later! This is why I attended the evening course organized by ICIF in Costigliole d’Asti (ICIF stands for Italian Culinary Institute for Foreigners). Our trainer was Alessandro Giagnetich: a power chef who can make what seem like complicated things to cook easy to make with the tools available in everyone’s kitchen. To be highly commended for his skills and recommended for your evening cooking classes in Costigliole d’Asti.
Your motivation for making grissini maybe different from mine: you may want to make them because they don’t do them where you live (likely), or because you want to look good with your guests, the very one you invited for dinner because you cooked grissini. Either reason is a valid one to me. Furthermore you will have an excellent opportunity of telling the guests you invited for the occasion, how you did them and how demanding it was, instead of having to talk about their kids (boring) or how sick they are, where, or will be (demoralizing).
You do not want to let them know how easy it is to make grissini!
So: let’s start preparing them!
Homemade “grissini”: 4 to 6 servings
Difficulty: medium
Time to prepare: 10 min for mixing flour and kneading (with a dough blender)
2 to 4 hours rising (while you go shopping or read a book, or else)
15 min. to shape the “grissini”
10/12 min to cook
Ingredients
400 grs of type 0 flour
200 grs of warm water
40 grs of extra virgin oil
5 grs of dry yeast
One small spoon of sugar (optional)
8 grs of salt
A handful of corn or “durum wheat” flour
Preparation
Warm the water; pour in yeast and sugar (optional), stir.
Pour the salt in the flour, stir, and pour in the warm water and the oil.
Knead by hand (bloody tiring and dull) for at least 20 min or use the dough blender (easy, no sweat, no need to do anything yourself – great invention) for 8 min at low speed. Stop when the dough is smooth and shiny.
Shape the dough like a football ball, cover the bowl with a wet towel and put it in the oven at 40 deg. centigrade. The dough will have risen and more than doubled in size in 2/3 hours. Alternately leave the bowl at room temperature: in this case the dough will be ready in 4/5 hours. No need to watch this: relax, go shopping, read a book, phone your friends, walk your dog, or socialize. In any case the dough will not be overdone, even 12 hours later.
Take the dough out of the bowl, fold it over twice, very gently, and very, very gently, work it to become a flattish rectangular shape about 8 cm by whatever length, by 2/3 cm thick.
Oil the working surface with a brush, oil the surface of the dough with the same brush, and cover everything with a film twice as large as the dough.
Leave the dough to rest a while, say, 20 minutes.
Pre-heat the oven at 2300 degrees centigrade
Cut 2 cm thick slices of dough stir them, and lay each grissino in the baking tray.
Put the tray in the oven (which by then will be at 230 degrees centigrade) and cook for 10 to 12 minutes. Baking time depends mostly on the size of the grissini and the blend of flour you have used.
 The marmalade of peppers, mildly to pretty hot depending on the variety of peppers available in your area, is an excellent side dish to your..
serving of meat (hamburgers, steaks, roast of beef or pork), as well as mild cow cheese. It can also be served as a dip with say, grissini or carrot and celery sticks.
Difficulty: easy
Time to prepare: 2 hours
Ingredients:
1 Kg of red and yellow peppers,
400 grams of chili peppers (or less if too hot),
1 small glass of white vinegar,
1.1 Kg of sugar ,
Preparation:
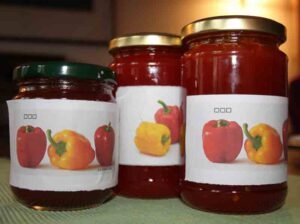
Cut the peppers, dispose of the seeds, then wash. Add the white vinegar and boil at high heat for about 30 minutes. Whirl thoroughly: once through whirling the compound must look like marmalade. Add the sugar, stir, whirl again thoroughly, and boil for an additional 30 minutes. Fill each glass jar, close the lid, store the jars upside down until cold.
Bravo! You’re done
 The name means nowadays “tuna fish sauce”. But it is not as simple as that;
here again, there is controversy: if not over the origin of the recipe, over its indigenous components. If we can affirm that the sauce originates in Piedmont, we are almost certain that it did not contain any tuna fish at its inception: or maybe it did. Let’s start with the origin: although the name may sound French it definitely is not: it is local dialect. Proof of this comes from the fact that no French is claiming this recipe as his: they would if they could. The expression “tonnè” probably meant “tanné” or “cured”, due to the “tanned”, somewhat brownish color of the sauce, and not “tuna”: the word was probably a local adaptation of the French equivalent. Now for the content: no tuna came canned in Piedmont from Liguria in the ‘700. Nor anybody claims that tuna was preserved under salt back then: anchovies were. Therefore the original recipe was probably made of olive oil, salted anchovies, and capers. All these ingredients came from Liguria and were traded seasonally with goods made or grown in Piedmont. We are also certain that the original recipe did not contain mayonnaise: the thing had not been known in Italy back then.
This is the most basic recipe of “Sauça Tonnè”: use it as a dip or as a sauce.
Difficulty: easy
Time to prepare: 20 minutes
Ingredients
80 gr. of tuna in olive oil,
6 small capers,
3 fillets of anchovies,
50 gr. of extra virgin olive oil,
One hard-boiled egg ,
A pinch of salt,
Preparation
Wash the capers thoroughly and cut the egg in small pieces; then put all the ingredients, but only half the extra virgin oil in a food processor, and mush the components. Add oil as required while blending until the sauce achieves a creamy consistency. Put in a cup, cover with plastic wrap paper, and store in the fridge until serving time.
This much salsa tonnata is enough for 6 to 8 servings.
 Il “Sugo di Carne” – 6 to 8 servings
Difficulty: easy
Time to prepare: 10 minutes, plus 1 hours of cooking time.
Il “Sugo di Carne”, or meat sauce, is the most common type o sauce used for dressing the Tajarin. The meat used is either veal or Italian pork sausage, or a blend of the two. The blend of veal and sausage is what I like best, so this is the one sauce I will describe inhere. Should you prefer to make the veal sauce only, use the same quantity indicated for the veal and the sausage, but put only the veal, or only the sausage. The cooking procedure is exactly the same.
Ingredients
30 gr. of soffritto (click here for how to make soffritto),
200 gr. of ground meat of veal (better), or beef (acceptable)
100 gr. of Italian pork sausage,
20 gr. of extra virgin oil,
50 ml. of white wine,
50 ml of broth of vegetables or of water,
A pinch of salt,
A pinch of pepper.
Preparation
Pour the extra virgin oil in a frying pan and add the soffritto when the oil is hot. Lower the flame and let the soffritto fry for 10-15 minutes: stir from time to time. Add some white wine as necessary and let evaporate. Take the skin off, then smash the sausage, then pour skinned sausage and ground veal into the frying pan. Let gently fry until the meat is brown, then add the salt and the pepper. Lower the flame still, and let the mix cook for another forty minutes. Keep the broth (or the water) warm, and add as required. When cooked, forty minutes later, the sauce is moist, not liquid: moist.
Drain the starters, leaving some cooking water, and gently pour into sauce pan. Return to heat if necessary. Stir. Serve and topple to taste with “Parmigiano Grattugiato” (Grated Parmesan Cheese).
Il “Sugo di Pomodoro” – 6 to 8 servings
This is the preferred “Sugo” for very delicate tasting starters such as the “Ravioli” filled with ricotta and spinach, but also Gnocchi or Tajarin.
Ingredients
10 gr. of soffritto (click here for how to make soffritto),
300 gr. of tomato paste or fresh tomatoes
20 gr. of extra virgin oil,
50 ml. of white wine,
A pinch of salt,
A pinch of pepper.
Preparation
Pour the extra virgin oil in a frying pan and add the soffritto when the oil is hot. The quantity of soffritto, half a tea spoon, say, or one table spoon, will determine how light or strong the sauce will be. Lower the flame and let the soffritto fry for 10-15 minutes: stir from time to time. Add white wine as necessary and let evaporate. If using fresh tomato, scald them first, then peel and cut in small pieces, then add to the soffritto. Add two cloves of garlic and some rosemary and let cook for 40 minutes at low eat.
Drain the starters, leaving some cooking water, and gently pour into sauce pan. Return to heat if necessary. Stir. Serve and topple to taste with “Parmigiano Grattugiato” (Grated Parmesan Cheese).
Il” Sugo al Burro e Salvia” – 6 to 8 servings
Difficulty: easy
Time to prepare: 10 minutes.
Very few recipes are easier than this one to make. This is the butter and sage sauce, used when cooking very light and delicate pasta, gnocchi or agnolotti.
Ingredients
100 gr. of butter
8 to 12 leafs of sage
Preparation
Put the butter in a frying pan and melt slowly. Add the sage and cook, very slowly, for no more than 10 minutes: this is enough time for the flavors to properly blend. Stir occasionally.
Drain the starters, leaving some cooking water, and gently pour into sauce pan. Return to heat if necessary. Stir. Serve and topple to taste with “Parmigiano Grattugiato” (Grated Parmesan Cheese).
 Every ethnic cuisine is based on some specific combination of tastes
and flavors which make that cuisine unique. In Langhe and Roero, three preparations are basic for about every antipasto (hors d’oeuvre) and every primo (starter) and secondo (main course): the “soffritto”, used in almost every entrée and main course, and two preparations which can be used as dips or sauces, the “salsa tonnata”, and the “bagnet”.
This article gives you instructions on how to prepare the “soffritto”.
Difficulty: easy
Time to prepare: 20 minutes
“Soffritto” means, “to fry slowly”: It is a mix of tastes and smells, from vegetables and aromatic herbs, that needs to by fried slowly prior to use as the ingredient of most recipes: soffritto makes our cuisine unique and special. It is used, in its numerous variants, in about everything which matters: from a meat sauce (with pasta), to the sauce in which you’ll roast the veal.
The origin of the recipe are not known, but its use is so popular, and widespread that every Italian culinary region claims to have been the place where it was invented. When it is obvious that such a claim cannot be made, then the recipe must have been invented by some Roman Emperor who lived either before or after Christ’s. When you think of it, it is very much like the birthplace of Christopher Columbus: the French claim that he was born in Corsica, The Italian in Italy, of course, but not every Italian agrees where to (it could be Genoa, Nervi or Savona), not to mention the Spaniards, and the Portuguese. Soffritto may not have helped to discover America but it certainly is a contended recipe.
Soffritto is a mix of finely minced vegetables and aromatic herbs. The most basic of soffritto consists of a mix of onions, carrots, celery, garlic, salt, extra virgin olive oil, and sometimes vinegar (made of wine) or white wine. The garlic can be minced and mixed in, or fried cooked in cloves, and then taken out of the mix, but it must be slowly fried with the rests. In general the tastier the dish you are preparing, the more aromatic the soffritto.
Soffritto can be prepared in advance, and then stored, raw, in small glass jars tightly sealed: you can keep them in a cup board (there is no need to keep them in the fridge it since salt and vinegar are great natural preservatives). You can keep the jars sealed for up to two months, but no more than a week, and then in the fridge once opened. Or you can make the soffritto on the go, when you need it.
The ingredients and the quantities that make a great soffritto are indicated below. “Must” have ingredients are shown as are the optional one. Should you like a taste or smell more than another, you can vary the quantities slightly. What is important is that all the components are used, more or less in the amounts indicated.
Once you master how to make soffritto, you are half way to cooking great Italian recipes.
This much soffritto can be stored in two small jars, and it will be enough for 20 servings of pasta.
80 gr. (1,6 oz) of Onions ( must be in)
80 gr. (1,6 oz) of Carrots (optional)
60 gr. (1,0 oz) of Celery (optional)
5 gr. (one clove) of garlic ( must be in)
10 gr. (0,2 ox) of Salt ( must be in)
10 gr. (0,2 oz) Extra Virgin Oil ( must be in)
2 gr. (0,05 oz) of Vinegar from wine
20 gr. (0,4 oz) Rosemary (optional)
10 gr. (0,2 oz) Sage (optional)
25 gr. (0,5 oz) Persil (optional)
20 gr. (0,4 oz) Basil (optional)
Preparation
Preparing the soffritto is very simple: you need a knife, a rocking knife, a wooden board to cut the veggies on, and one or more jars to store it. Wash carefully the vegetables and the aromatic herbs, cut them with a knife first, mix them, and then mince them with the rocking knife. Put the chopped veggies in a jar, add the extra virgin olive oil, the vinegar and the salt, mix well and then seal the pot. If you prepare this recipe on the go, then put the compound in a frying pan and slow fry until the vegetables become soft and a little of a yellow-brownish colour: add some white vine, as necessary, not to let the thing burn.
You have just made your first soffritto: you are ready to cook great Piedmont recipes.
 “Vitel Tonnè” – 6 to 8 servings
Difficulty: easy
Time to prepare: I hour, excluding cooking time.
“Vitello Tonnato” is possibly the most traditional of Piedmonts’ hors d’oeuvres: it is a must on the menu of any restaurant serving our cuisine. It is also a very popular antipasto in places where North Italians have traditionally emigrated, such as Brazil and Argentina as opposed to Canada and the United States where the vast majority of Italians come from the South of the booth.
Ingredients
800 gr. of round of veal. Your butcher should tie the meat to keep it tight.
3 tablespoons of Soffritto (click here for how to make soffritto)
50 ml of extra virgin olive oil
50 ml of dry white wine
Preparation
Most recipes will have you boil the beef in water with a blend of vegetables: some recipe will even instruct you to keep the veal in the cold broth for 24 hours before cooking. Well … the boiled meat tends to be very dry and taste like sawdust, which is not what you’re aiming for. The veal should be broiled, not boiled. So …
Pour the oil in a pan, bring to frying temperature, pour in the “soffritto”, turn the eat down and let gently fry for 10/15 minutes, until the blend of vegetables is light brown in color. Pour the white wine and increase the eat: let the soffritto cook for another minute or so, or until the wine evaporates, then place the round of veal in the pan and brown it all around. Pre-heat the oven at 1500 C, cover the pan with an aluminum sheet, then put it in the oven for about 55 minutes. Check periodically, and add water to keep the roast moist. The roast should have a crusty brown skin, but be pink in the middle.
Let the veal cool in its broth, then cut it in very thin slices with a very sharp meat knife, and a steady hand, or, better, a meat cutter. A meat cutter will greatly improve your chances of cutting thin slices out of the roast of veal. The veal is cut thin in Piedmont, where the recipe originates from, but may be sliced in thicker slices elsewhere. Please don’t do this: you’d compromise the very balance of taste and smell of this very fine and delicate dish.
Serving
You can serve this antipasto as individual servings or, if your kitchen’s not big enough, in one larger serving dish from which your guests will help themselves. Both serving methods are acceptable. Just make sure that you cover the dishes with plastic wrap paper when prepared in advance: otherwise the salsa tonnata will dry, assume a dark brownish color, and look awful.
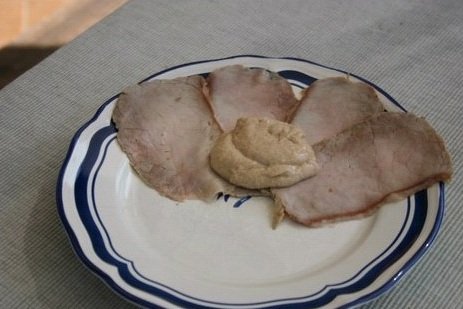
For individual serving lay three or four thin slices of meat on one side of the dish, making sure that the slices overlap some, and then put a lump of salsa tonnata on top. You can decorate the dish with two leafs of basil.
When prepared in one large serving dish, lay the slices flat on the plate, making sure that each slice overlaps the next by half of its width, and then smear the salsa tonnata on top of them. You can decorate the plate by putting some capers on top: do not put many of them because they are very tasty, and putting too many will compromise the delicate balance of taste and flavor you have worked so hard to prepare.


